

WHAT IS WOOCOMMERCE EXTRA VARIATION (EVP) ?
Customization is everything! This was the first thing when we needed to build a project around WooCommerce, standards weren’t good enough for us to create what our customers wanted. WooCommerce has a standard and clean product management, variations are standard too, you just can’t do any customization on it. You may need to click 4-5 times to add some basic info like size or color. It is boring and not enough for a professional online shop.
Therefore, we created the most powerful addon for WooCommerce shops, it is WooCommerce Extra Variation plugin. It is a simple, fast and customizable replacement of standard WooCommerce variations.
If you are running a restaurant, you know everybody has their own taste of food and they always want different ingredients, you need to spend a lot of time to create this with WooCommerce defaults and still you won’t be pleased with the result. By using our plugin, you just need 5 minutes to create all your extra menu and customers can order whatever they like easily, you’ll see selected variations in your order page.
Online shopping was limited when it first started, now we can get almost everything from online shops. Selling a basic Notebook with WooCommerce standards is easy, but if you want to sell computer parts and allow your customers to build their own PC with the compatible parts, in this part you need our advanced Extra Variation plugin. We have conditions feature, you can link products with each other, this way you can show the right path to your customers and they can build a compatible PC. Another easy job for our plugin, almost impossible for standards!
WooCommerce Extra Variation is now one of the best plugins of WooCommerce, over 500 stores in Worldwide using our plugin to enhance their WooCommerce stores. We are getting feedback from different business models and we turn them to new features. Added a buyer input area, which allows your customers to write a text info for a customized product such as t-shirts or mugs. We also allow you to show different thumbnails with selected variation.
Like all our plugins, we have a fast and very effective support for Extra Variation. Always up to date with the latest versions of WooCommerce and WordPress. Our team checks all changes and updates plugin codes quickly to make Extra Variation compatible. We also improve our code regularly with the latest php changes and make it stable and fast.
WooCommerce Extra Variation is the best and most advanced way of enhancing regular WooCommerce products, if you need something better than standards, this is the plugin you are searching for.
SETTINGS
Group name
Variation name
Automatic Select
Variation type
Variation price
Price type
Description for variation
Filter button for the variation table
Group name
Variation name
Variation Table
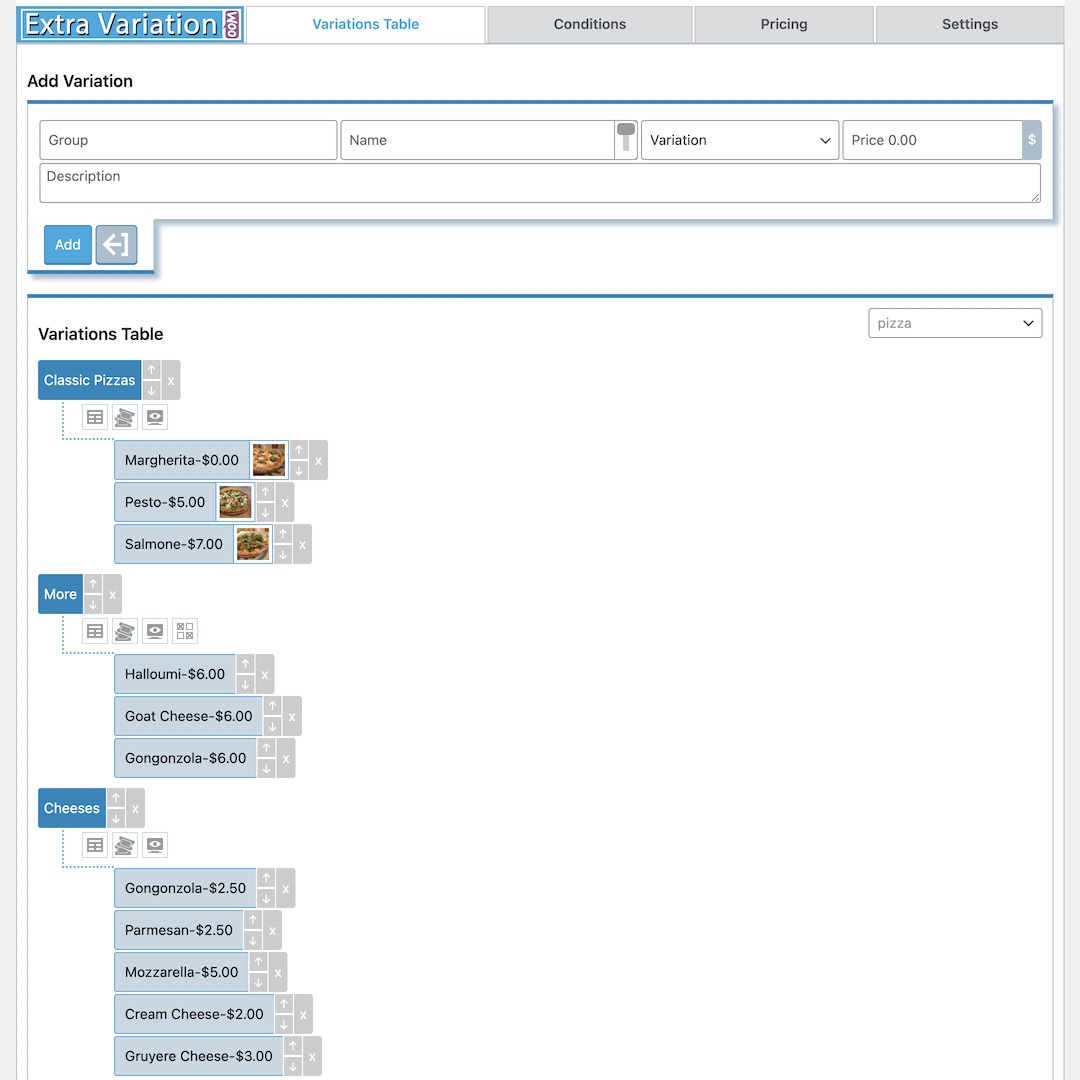
When you install the Extra Variation plugin, it will add a shortcut under your Products tab. Click on the “Extra Variation” tab to open our plugin settings. You can adjust all of the plugin settings from this section.
Adding a New Variation
First of all, you need to create variations. It is simple and you need to fill just one line.. “Group” is the name of variation will be added, “Name” will be variation name, there is a toggle called “Automatic Select”, if you activate this, this variation will be activated by default. In the “Price” area you can only use numbers and “.” to specify the variation price. By default currency symbol is active here, you may change it to “%” symbol which creates an automatic price from product price. For example if the main product price is 100$ and you enter %10 here, the variation price will be 10$.
We are using default WooCommerce settings here, so your currency or decimal settings will match with defaults, no need to change anything.
“Description” area where you can add some information about variations, we support shortcode features so you may use a shortcode here by typing [sc] tag, for example [sc][Short Code][sc]. There is an upload button next to the “add” button, this is where you can add a thumbnail for your variation.
Last move is to click the “add” button, this will create a group and variation.
Note: When you create a new Group, by default it is activated for all categories. If you want to add it on a specific product or a product group, you need to edit the group by clicking on group name.
Adding New Variations to a Group
We are using names as identifiers here. So when you want to add new variations to an existing group, just use the same name, it will automatically add to the existing group. If you want to add a new variation to the “Cheese” group, just use “Cheese” as the group name.
Make all entries as described above.
Click the Add button
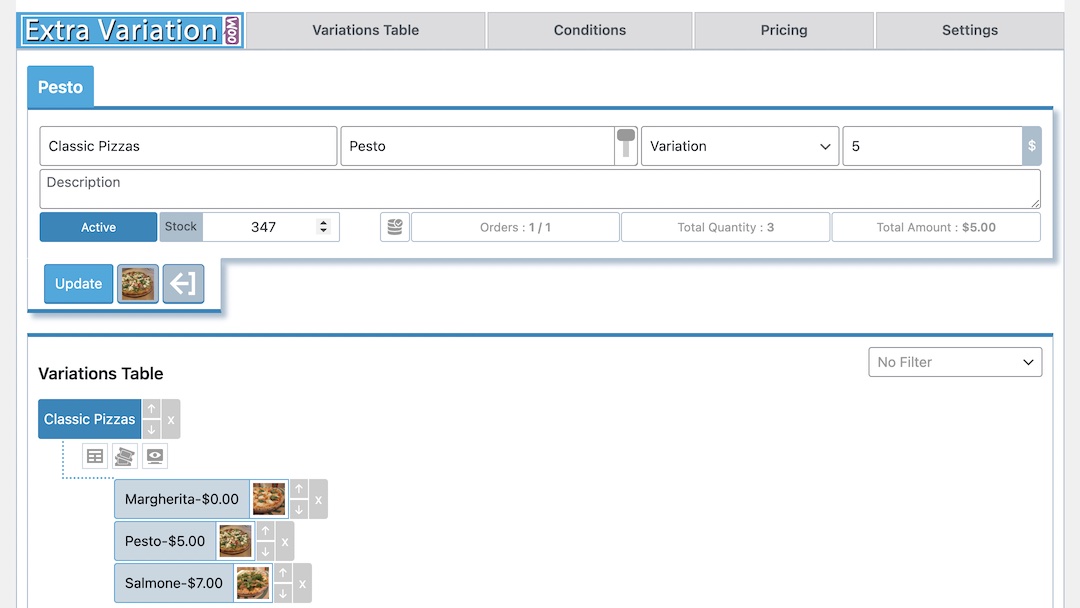
Changing an existing variation
In order to change variation details, you need to click the variation name. Input field will be filled with variation details and the add button is gonna change as “update” so you can change details and update the variation.
Click the variation name
Change details
Click the Update button
Changing an existing Group
Just the same as above. Click on the Group name and change details and use the update button to save settings.
Click the group name
Change details
Click the Update button
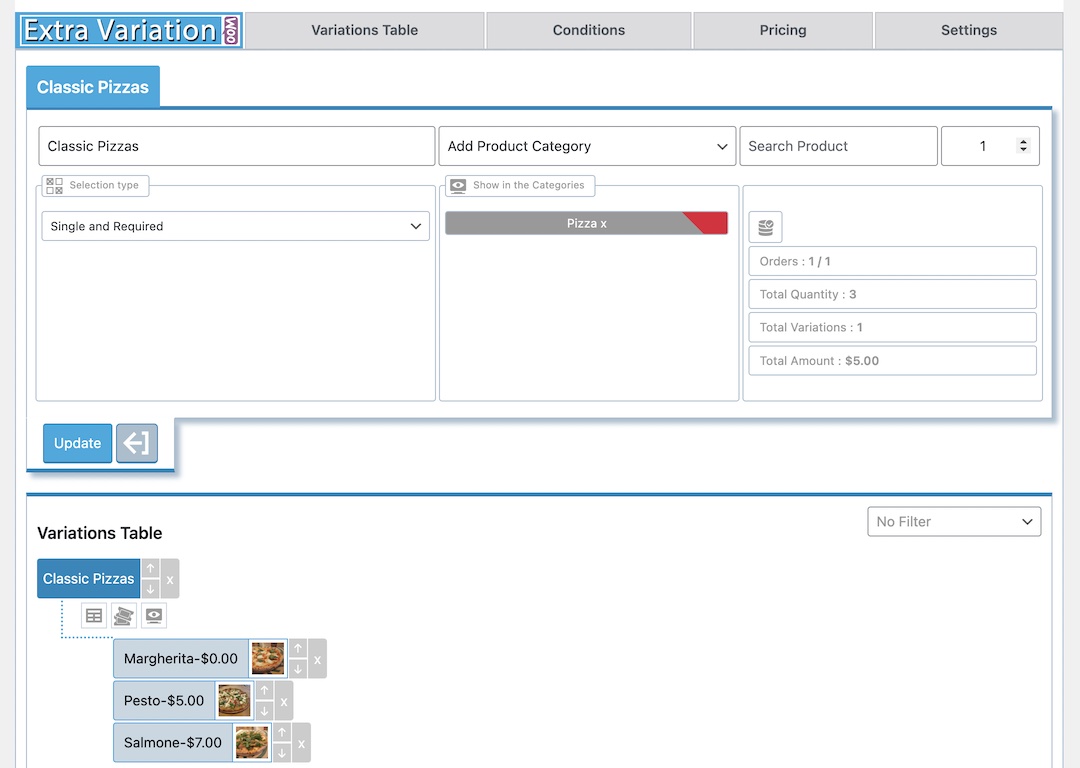
Change the categories in which the group will be displayed
You have to edit your groups if you want to show them in specific categories. By default groups are activated on all products, you can edit the “add product category” area to specify where this group will be displayed. Selected categories will be “show in the categories” area, you can do the same thing for other categories and add more here. In order to delete one category, just use the “x” mark.
Note: Categories which are empty won’t be displayed.
Click the group name
Select a category from the list or type product name by “Search Product” place and select the product name from the opened list.
Your selected categories or products will show here
Click the Update button (If you select the category from the list, it will automatically update)
Selection types in Groups
Extra Variation plugin comes with lots of powerful options, one of them is selection types. You can control how many variations can be selected, limit some selections and make some of them required for orders. By default, all groups come with “Multi Choice” selection type. You can change these as “single, single and required, single each group etc.” For example if you want to create a computer building wizard with Extra Variation plugin, you may want your customer to select one mainboard only, these selection types allow this.
Click the group name
Select a type from the list.
Click the Update button
Stock Management
The Extra Variation plugin has its own stock management, is independent, unique and easy to manage like all other features of our plugin. Sometimes you may need to make a variation passive We just added a “variation status” option, which allows you to temporarily disable or enable some variations. Also, we added a brand new report feature with an export option. This way, you can get detailed order reports of extra variations.
Stock Control
There is a new setting called “stock control” for stock management in the plugin settings. If you activate it, the Extra Variation plugin will automatically start checking stocks for variations. (Please make sure that you specify stock counts for all of your variations before activating it.) If this setting is enabled and a variation is out of stock, this variation will be passive, grayed and non-selectable for orders.

If you activate this, the Extra Variation plugin will automatically start checking stocks for variations. (Please make sure that you specify stock counts for all of your variations before activating it.)
Stock Editing
You can edit stock counts by clicking on the variation name. A new field will appear and you can specify the stock count and update it. But if you have a lot of variations, this will take too much time. This is why we also implemented a bulk stock editing feature. You can click the icon right under the variation group and you’ll see all variations listed with price and stock areas. Just edit these and save them, it will change your variations stock faster than doing them one by one.
Click the variation name
Enter stock
Click the Update button
Variation Status
When you click a variation’s name, you’ll see a new button. With this button, you can make a variation, active, or passive. For example, if you have a temporary stock problem with a variation, you can make it disabled until it is in stock. By default, all of your old variations will be active. You can change this by clicking the button once to disable and update them.
Click the variation name
Click the button for change
Click the Update button
Report Option
We had a report option for variations, but now it is enhanced. Now you can get detailed reports by filtering orders, stocks, and variations. Also, you can specify dates and export this report as a CSV file. What are the most popular variations? Which ones are going out of stock? Which variation has low demand? We wanted to make these questions easy for your management. Now you can use our detailed reports for advanced data.

Select the Order from the list
Choose the number of orders
Select the order date range
Click the show button to view
Click the show button to export
The order data for groups and variations
Now when you click on any variation or group name you can see some stats on the right side. With these statistics, you can see how many copies you sold and how much the total amount gained from groups or variations. This is a really powerful statics tool for you to add or change your variations based on popularity.
The order data for groups and variations
Delete an Existing Variation
Just click on the ‘X’ button next to the variation you want to delete. When you click here, there are no other confirmation windows and can’t be undone. So please make sure you want to delete before clicking the “x” button.
Delete an Existing Group
Just click on the ‘X’ button next to the group you want to delete. When you click here, there are no other confirmation windows and can’t be undone. So please make sure you want to delete before clicking the “x” button.
Delete a Selected Thumbnail
Just click on the thumbnail next to the variation you want to delete.
Click the “x” button for the group or the variation deletion or click the thumbnail for thumbnail deletion.
Bulk Price Editing
We are adding new features to make our plugin easier to use. Bulk Price editing is one of them. Now you can edit all prices in a group by clicking the calculator symbol under the group name. It will open variations and prices window, you can change the click save button. If you want to cancel, just click the X button above.
Changing Orders of Variations and Groups
We have up and down arrows on each group and variations. We are using these for orders. When you mouse hover in arrows, you’ll see what is the rank of this group or variation. Clicking up and down arrows changes these orders so you can control their rank.
Also now we support drag and drop features for changing orders of variations and groups. You can drag and drop any variation and click the “save order” button when you are done. Same applies to groups, when you drag a group, it will come with variations inside.
Buyer Inputs
It is good to choose options for your customers but it is also good to get some info from them. This is why we created the Buyer Inputs feature which is now included in the variations table directly. With this feature you can get some additional information from your customers to create different orders. You can add custom text and text areas and use them on existing groups. Your customers will see a text box and when they write something here, you’ll see it in order pages.
To create a Buyer Input, you need to fill a simple form. Same as creating a variation but this time you have to select group name, input area and selection type for buyer inputs. When you enter this information just click the add button. There are three different selection type here;
Text Input
You can leave the line field blank and simply click add. This is for basic Text input.
Textarea Input
You can enter the line number for the text area. For example if you enter 4 as a number, you’ll see 4 lines of text area.
File Upload
This is the latest and one of the biggest improvements of the last update. Now our plugin allows your customers to upload a file from their computer. This way you can get images from your customers and allow them to customize their order. Great addition for creating customized mugs or t-shirts etc.
Conditions

Variation selection for Condition
WooCommerce Variable Name for Condition
The Condition for Product Quantity
Adding a condition for Group
Adding a condition for Variation
Added condition for variation
Added condition for group
Click the name of condition for deletion
Conditions are one of the most powerful features of the Extra Variation plugin. You can create dependencies within groups and variations, which will allow you to lead your customer to a specific order. Conditions are a very powerful and advanced feature, so be careful while creating them first.
Adding or Deleting Conditions
When you click the “conditions” tab on the Extra Variation plugin settings, you will see all Variation tables and buyer input as one tree here. But this time you’ll notice that all created variations, groups and buyer inputs come with plus sign (+) next to them.
Adding a variation is simple, just click plus sign next to the variation or group you want to create a condition. You can select another variation to link with or standard WooCommerce variation or a quantity limit. In order to use WooCommerce Variation you need to specify the exact same name of variation. For example if you have multiple variations like Big and Red as WooCommerce variation names, you need to specify both as a name like “BigRed” and make sure that you write it exactly the same way, careful about capitals, no spaces and lower cases. For quantity limit, you can create a minimum amount of quantity here, for example if you create 2 quantity limit as condition, condition will be active when customer selects minimum 2.
It is better to create a condition scenario first and apply these conditions after. You can create a size group for example and depending on these group selection, you can show different variation groups. When a customer selects “small” from a size group, you can show them a totally new group.
Click plus icon for Group or Variation
Choose the variation or type variable name or quantity number.
Click the Add button
Click the name of condition for deletion
Hide Group, If Unselected This (Group Conditions)
You can add show/hide conditions for you want group.
In up screenshot, if click one of selected variations will show “Gift Package” group.
Lock / Unlock (Variation Conditions)
If add conditions for variations, the variation will remain locked until the conditions is clicked.
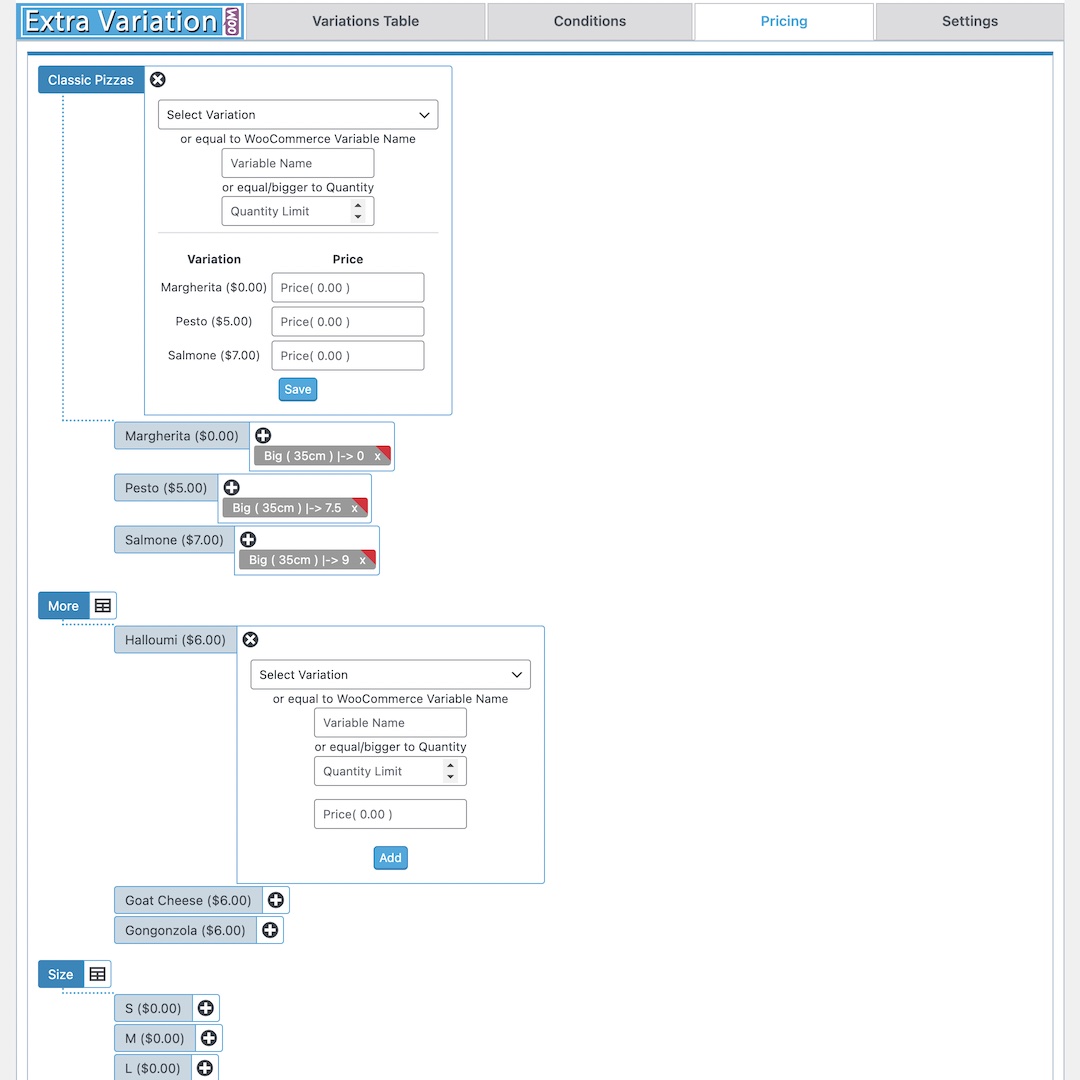
Pricing
Bulk pricing for variations of the group
Variation selection for Pricing
WooCommerce Variable Name for Pricing
The Pricing for Product Quantity
You can create conditions for variations and in addition to that you can create price dependencies between them. For example you may need to give different prices depending on the selection size, so all you need to do is to create a size group and first allow your customer to select this. Then name a price for this selection.
Adding or Deleting a Price
In the pricing section you can change variation prices for selection. Click on + (plus) sign, select a variation and name it’s price. Also you can edit bulk prices by clicking on the icon next to the group symbol. Just select a variation and give a unique price for it. In this area you can select WooCommerce Variations too. In order to use WooCommerce Variation you need to specify the exact same name of variation. For example if you have multiple variations like Big and Red as WooCommerce variation names, you need to specify both as a name like “BigRed” and make sure that you write it exactly the same way, careful about capitals, no spaces and lower cases.
Sorting the Price Conditions
Price conditions may overlap, this is why we are using priorities here. You need to sort your conditions to make sure which condition has the highest priority. Sorting the Price Conditions is easy, we have a drag and drop feature. You can start changing position by dragging the arrow. When you are done sorting, you need to click the “save order” button.
Settings
The Delete All button will delete all variation tables and settings
This feature shows the selected variants on the product page as a small floating window.
Question
This is the setting where you can add a title for the Extra Variation tree. Your customer will see right above the extra variations, you can add any caption you want. (Note: We recommend that you avoid using quotes (‘ – “) in this area. Some databases have problems converting these marks, which may cause problems.)
Group Title
Each group has its own title. You can hide or show these titles to your customers.
Connection Line
There is a connection line between Group names and variations. You can hide or show this line. This is a visual feature only, nothing changing by hiding or show except a connection line, variations still attached to their groups.
Show Variation
We have 3 different options for how to show your variation. You can set “name” only, “thumbnail” only or “thumbnail + name”. (Note: If you use the “thumbnail” only feature, make sure that you have uploaded thumbnails for all of your variations.)
Price
You can show variation prices or hide them. Also we have an option here which enables hiding some of them and showing others, you need to select hide when there is zero option. This way you can set some variation prices to 0 and their price tag will be invisible. (Note: This setting is suitable especially if you use “size” or “color” type variations, you can set their prices 0 so they will be listed as no price variations.)
List
There are two options here. One is “list”, the other is “follow-up”. This is a visual setting only.
Cart / Order Title
This is the title for cart and order pages. Whatever you write here, it will be shown on cart and order pages. (Note: We recommend that you avoid using quotes (‘ – “) in this area. Some databases have problems converting these marks, which may cause problems.)
List Type of Cart / Order
Same as the list option but this time it is for cart and order pages. You can select list or follow-up as options.
Product Image Change
By default it comes as “no”, if you change this as “yes”, when your customer selects a variation, its picture will be shown on product image area.
Attention!
Cart only shows the name of the variation. The variation thumbnail is not show on the cart.
Max Limit Message
If there is a selection limit on multi-choice features in a group, this message will be shown when the limit is exceeded. (Note: We recommend that you avoid using quotes (‘ – “) in this area. Some databases have problems converting these marks, which may cause problems.)
Min Limit Message
If there is a minimum selection limit on multi-choice features in a group, this message will be shown until your customer selects the minimum amount. (Note: We recommend that you avoid using quotes (‘ – “) in this area. Some databases have problems converting these marks, which may cause problems.)
Show Option
For variable products, you can lock and make transparent our extra variations until a variation is selected. If you enable this, extra variations will be grey and locked, it will be activated when customers select a product variation, and the variation tree will be active. You can write an indication message for your customer to tell them to select a variation first.
(Note: We recommend that you avoid using quotes (‘ – “) in this area. Some databases have problems converting these marks, which may cause problems.)
Upload File Type
You can set the type for the upload file. You must use a comma between types.
Ex : image/*,.pdf (Default: image/*)
Note: SVG files will be rejected when attempting to upload them through the media uploader. You must allow SVG through WordPress media uploader.
Upload File Size (MB)
You can set the limit for the upload file size. The entered number is MegaByte. (Default: 2 MB)
Stock Control
If you activate this option, the Extra Variation plugin will automatically start checking stocks for variations. (Please make sure that you specify stock counts for all of your variations before activating it.) If this setting is enabled and a variation is out of stock, this variation will be passive, grayed and non-selectable for orders.
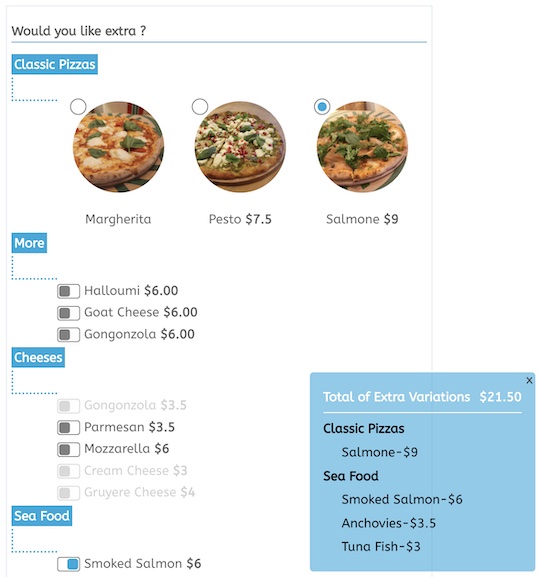
Info Box
This feature shows the selected variants on the product page in a small floating window. This floating window shows on the right-bottom of the screen by default. You can use CSS tags to customize the window for your site. Also, you can choose whether to show this window or not in the settings tab.
Single Price
When displaying the price on the product page, add the selected variants’ prices to the product price and present the total as a single, combined price.
Quantity Control
Enabling this feature will display additional controls (such as +/– buttons) next to the product variations, allowing the user to select the desired number of variations (default is 1). If stock control is enabled, the quantity of pieces cannot exceed the available stock amount.
If the user selects a quantity that exceeds the stock amount for the given product variation, the quantity will not increase and an error message will be displayed in the “Max Limit” field.
Theme Color
When a color is chosen in this section, it substitutes the sections we initially painted with the standard blue color (EVP blue) with the newly selected color.
Ex: the checkbox, infobox and other relevant areas.
Custom CSS
The CSS properties entered in this field will take effect when the page is loaded. It’s important to note that this field has no code control, so it’s crucial to enter valid CSS codes.
Attention!
If you’re unfamiliar with CSS, it’s recommended to seek assistance from someone with expertise in this area.
Which language support is available ?
Full language support is available. English and Turkish language support is included in the package. If you help me, I can translate in your language with a little text.
Installation
To perform an update or a new installation of the Plugin, please log in to your CodeCanyon account and navigate to the downloads section where you can download the Plugin, similar to the process you followed when you initially purchased it.
Note: Please be advised that our Plugin is exclusively downloaded through CodeCanyon, as CapariSoft is an Exclusive Author that solely sells items on Envato.
Additionally, kindly ensure that any previous versions of the Plugin have been uninstalled before proceeding with the installation process.
With Admin Panel (wp-admin)
- Go to Plugins / Add New menu
- Click ‘Install Plugin’ button
- Click ‘Choose File’ button
- Choose compressed file (extravariation.zip) and click “install now’ button.
With Ftp
- Unzip the compressed file. (extravariation.zip)
- Copy the plugin folder (extra-variation) to the / wp-content / plugins / folder.
Activate the Extra Variation plugin from plugins menu. You can customize the Extra Variation plugin under the Products menu.
FAQ
What does this plugin do?
WooCommerce Extra Variation plugin allows you to create variations for your WooCommerce products
How can i create variations?
It is really simple, all you need to do is to write a group and product name, define the price and click add button.
How can i add variations under the same group?
When you are adding new variations, just type the group name you want to add.
Can i re-order groups and variations?
Yes, there are arrows near the variation name, you can click and change order from here.
Can i add a customized area for customer input?
Yes, you can. You need to click ‘Buyer Inputs’ from the tabs and add from here. You can select text and text area boxes and specify the line for this area.
Can i change the already added variation?
Yes you can, just click the variation, it will appear on the input area, change whatever you want and click update. You can use same thing for the groups.
Can i add product category based variations?
Yes, by default all variations work with all products. But you can specify which products will have these variations. Click a group, select a product category and update it.
Can i add thumbnails for extra variations?
Yes, just select a thumbnail from the picture icon near the update button.
Can i create conditional variations?
Click ‘Condition’ tab, you will see your variation table. All products have plus sign near them, click on them and select the product you want to match. Start from the bottom and always place your main products first in the list. When you complete matching all of them, plugin will require the relations for each product. For example if you didn’t add product two for product one your customers won’t be able to select product two if they select product one first.
How Can i Create Different Prices for Different Variations?
You need to create your price tree first, this is for default variation. If you have Small – Medium and Big variations for a product, you need to go Pricing Section in EVP plugin and click the button next to Group name. This is for bulk editing, write your variation name in this area like ‘big’ or ‘small’ and add new prices. When your customers select Big variation, it will show Big’s prices. If you have multiple variations like size and color, you need to specify both of them for variable name like BigRed, no spaces and exact text.
Can i change the button type?
Yes, we have options like Radio button and Checkbox. You can specify them from variation group editing area.
Can i use conditional variations with all selection types?
Yes, you can.
Can I use different selection types for each group?
Yes, it is possible. You can click to group name for editing and choose selection type, if you want to specify this selection type only for this group, you need to select group too. Once you both choose selection type and group, it will become unique for this.
Can I edit conditional prices without clicking one by one?
Yes, it is possible with pricing tab. You can click Pricing tab and calculator symbol next to the group name, it will allow you to specify conditional prices under this group. Just select a condition and name the price. You can create variations for different prices, for example you can create ‘small, medium and big’ sizes and specify prices for this.
Is it possible to take a backup of my variation tree and settings
Yes, we have a backup option, it is taking an online backup to your database and when you need to roll back, it takes settings from there. You can create a backup after making creating your variations and conditions. Just go to settings and click ‘Backup all settings now’ if you need to restore, it will show you the last backup time and you can click “restore last backup” it is really simple.
3.3.4
- Compatibility: WooCommerce HPOS (High-performance order storage)
- Update: Improved performance
- Compatibility: WordPress 6.8x
- Compatibility: WooCommerce 9.8x
3.3.3
- Fix: The duplicate variation list under the product name in the cart.
- Compatibility: WordPress 6.3x
- Compatibility: WooCommerce 8.2x
3.3.2
- Fix: Jquery Css loading issue
- Update: Improved performance
- Compatibility: WordPress 6.2x
- Compatibility: WooCommerce 7.8x
3.3.1
- Fix: WC Actions Submit/Variations/Quantity
- Update: Improved performance
- Compatibility: WooCommerce 7.5x
3.3.0
- New Feature: Single Price for the product page
- New Feature: Theme color selection for the frontend
- New Feature: Variation Quantity Selection
- New Feature: Custom CSS
- Update: Improved performance
- Compatibility: WooCommerce 7.4x
3.2.9
- New: Info Box – Shows the variants selected in the product area in an information box
- New: Improved performance
- Compatibility: WordPress 6.1x
- Compatibility: WooCommerce 7.3x
3.2.8
- Fix: Problem with variable names containing numbers from the condition tab and the pricing tab
- Compatibility : WooCommerce 7.0x
3.2.7
- Compatibility : WordPress 6.0x
- Compatibility : WooCommerce 6.9x
3.2.6
- Compatibility : WooCommerce 6.5x
3.2.5
* New : Export option for orders report
* New : Bulk stock editing (Click the bulk editing button below the variation group’s name)
* New : Stocks table (Select filter on Variation Tab)
* New : Orders table (Select filter on Variation Tab)
* New : Stock management
* New : Variation status (Active/Passive)
* New : Improved performance
* Compatibility : WooCommerce 6.3x
3.2.4
3.2.3
* Fix : Undefined is not an object (evaluating ‘wp.media.model’)
* Fix : Single Quote Issue for Name (Group Name & Variation Name)
* Update : Improved performance
* Test Up : WordPress 5.9x
* Test Up : WooCommerce 6.2x
3.2.2
WARNING: THIS UPDATE WILL REMOVE ALL CONDITION AND PRICING RULES IN ORDER TO GET A NEW UPDATE
* Update: Buyer Input tab and Variation Table tab merged.
+ Variation type selection has been added to the Add Variation area.
* New : Drag & Drop variations
+ Variation Table -> Group or Variation -> Drag and Drop -> Save Order
* New : AutoComplete for group name
+ Variation Table -> Group / type name
* New : File Upload
+ Buyer Inputs -> Add Input / Select File Upload
* New : Analytics for groups and variations
+ Variation Table -> Edit Group / Variation
* New : List of Cart/Order
+ Settings Table -> List of Cart/Order : Line / Row
* New : Admin Panel
* Fix : Image change process
* Update : Improved performance
* Test Up : WordPress 5.8x
* Test Up : WooCommerce 5.9x
3.2.1
* New : Entering the description for the variation
+ Variation Table -> Edit Variation -> Enter description
* Test Up : WordPress 5.6x
* Test Up : WooCommerce 4.9x
3.2.0
* New : Entering the variation price as a percentage of the product price
+ Variation Table -> Edit Variation -> Click Currency Symbol
* New : Filter for list groups to show on the Variation Tab
* New : Edit group rank
* Fix : Null admin variables issue
* Test Up : WordPress 5.6x
* Test Up : WooCommerce 4.8x
3.1.9
* New : Show text on a product image
+ Buyer Inputs Table -> Edit Variation -> Select checkbox (Show text on a product image)
* New : Selection type : Selectbox for group
+ Variation Table -> Edit Group -> Selection Type -> Selectbox
* New : Min Selection Limit
+ You can set min selection limit for “Multi Choice” from group editing.
+ Settings tab -> Min Limit Message : You can set min selection limit message.
* New : Show Option + Settings tab -> Show Option.
* Fix : Duplicate currency symbol issue in the order description on the admin panel.
* Fix : Improved admin.css for WordPress 5.4x
* Update : Improved performance
* Test Up : WooCommerce 4.2x
3.1.8
* Test Up : WordPress 5.4x
* Test Up : WooCommerce 4.1x
3.1.7
* Update : Database & Settings from Settings Tab
+ Improved performance
* Fix : Improved admin.css for WordPress 5.3.
* Test Up : WordPress 5.3x
* Test Up : WooCommerce 4.0x
3.1.6
* Compatibility : WordPress 5.2x
* Compatibility : WooCommerce 3.7x
3.1.5
* New : Pricing by quantity
+ Pricing set for quantity.
* New : Quantity condition
+ Conditions set for quantity. Group show/hide or variation disable/enable.
* New : Default checked variations when page is loaded
+ Click the name of variation
* New : Duplicate Group
+ Clones your groups of the variations table/buyer inputs with the new group name.
* Fix : Condition rules
+ Check element visibility for condition (Radiobox issue)
3.1.4
* Update : Removed “Check if WooCommerce is active”
* Update : Hide EVP div: if there is no group in EVP (Condition tab)
* New : WC tested up to: 3.6.3
3.1.3
* New : Conditions to “WooCommerce Variable” name
+ Added variable name input in “plus icon” on the “Conditions” tab. Runs conditions for the selected variable name”.
* Fix : Condition rules
+ Check element visibility for calculating price
3.1.2
* New : Delete Thumbnail
+ Deletes thumbnail for variation
* Fix: Single and Required option issue
+ Runs conditions for selected “Single and Required” variation when page load
* New : Tested up to :
+ WordPress 5.0.x
+ WooCommerce 3.5.x
3.1.1
* New: Selection Limit
+ You can set a selection limit for “MultiChoice” from group editing.
+ Settings tab -> Limit Message: You can set a selection limit message.
3.1.0
* New : Added unique group class
+ You can set CSS each group on Front End
* New : WooComerce Smart Pricing Plugin Activation
+ Sets smart pricing for extra variations
* New : Fix Database
+ Settings tab -> Database & Settings -> Fix : Renumber variation ids on your database.
* New : Delete All Variations
+ Settings tab -> Database & Settings -> Delete All : This feature is deletes all variations on your database.
* Fix : Hide thumbnail If empty
* Fix : Get selection type when adding a new variation
* Fix : Added space between selected extras on Front End
* Fix : Check condition when the page loaded.
* Fix : Auto increment id issue when creating DB.
3.0.9
* New : If price is zero: Disable
+ Settings tab -> Price : Show (Hide Zero)
* New : Bulk Prices Editing
+ Variations Table -> under the edit group icon
3.0.8
* New : Selection type for each group
* New : Conditions set for single type (Radio type)
* New : Pricing for single type (Radio type)
3.0.7
* New : Improved performance
+ Add extra selector : class (‘.extra_amount’) on extra_amount_remove function.
* Update : Change JQ selector for price tag (product/cart/price)
* Fix : Tag issue on the Cart Page (EVP)
3.0.6
* New : Backup All Settings
3.0.5
* Fix: Change Product Image (No) issue
3.0.4
* New: Pricing
* New: Price Format from WooCommerce Settings
* Update : Database update
* Delete Relations for “WooCommerce Smart Pricing”
3.0.3
* Update : Database update
* Fix : Changed show criteria (Category Slug and Product Id)
3.0.2
* New : Added CSS for order items
* New : Show image when clicking thumbnail
* New : Editable title for Cart/Order
* New : Extra Variation Total on Order
* Fix : for only plugin ( style & script )
* Fix : Load script issue (for some themes)
3.0.1
* Fix : Product Search Input
3.0.0
3.0.0
New: Admin panel
New: Media button for thumbnail
New: Conditions
New: FAQ
3.0.0
New: Admin panel
New: Media button for thumbnail
New: Conditions
New: FAQ
2.0.7
New: WooCommerce compatibility 3.x
2.0.6
New: Extra description design in order
2.0.5
New: Buyer Inputs : Text & Text Area
New: WooCommerce Smart Pricing Support
2.0.4
New: Product-based showing
Fix: Number format issue
2.0.3
Fix: Group rank issue
Fix: Show in all products issue
Fix: Name order issue
Fix: Must-have choice for radio button issue
2.0.2
New: Group rank
New: Variation rank
New: Must-have choice for radio button (Single and Required / Single Each Group and Required)
Fix: Zero price issue
Fix: Delete group name issue
2.0.1
New: Sellection Type : Multi, Single, Single Each Group
2.0.0
New: Admin Panel
New: Question Customization
New: Show & Hide Group Title
New: Show & Hide Connection Line
New: Show Variation Name Type : Name, Thumb, Thumb & Name
New: Sellection Type : Multi or Single
New: Show & Hide Price
New: List Type : List, Follow-up
1.1.0
Fix: Text Domain issue
Fix: Non-dot decimal separator issue
1.0.0
Initial Release