How Do I Add Extra Variations to My Products?
First of all, you need to purchase our plugin from CodeCanyon. We are working with CodeCanyon exclusively, so if you somehow download our plugin from somewhere else or bought it from another website, you have to contact us cause it is not licensed and won’t be supported by our team.
Adding a variation is very easy. By default, all newly created variations will be shown under all of your products. Of course, you have a limitation by selecting some groups but the default is active for all. Once you install WooCommerce Extra Variation Plugin it will be listed under the “Products” menu on your WordPress. Click “Extra Variation” to open plugin settings.
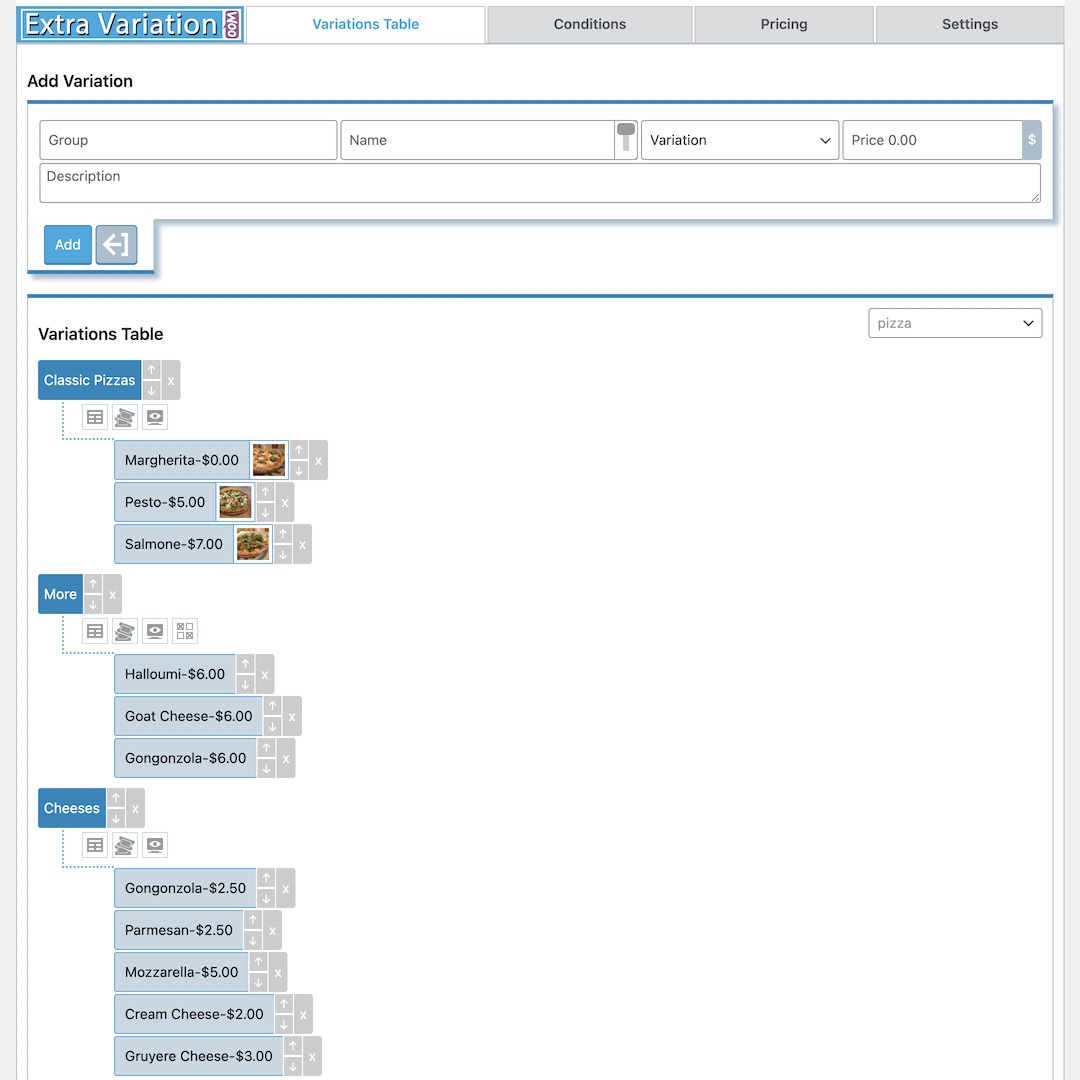
Adding a variation screen is the first screen you’ll see. You have to specify group, name, variation, and price, description area is optional. There is a picture sign right in the add button, you can upload a thumbnail for your variation by using this. When you fill all required fields, just click the add button to finish creating your first variation.

Variations Table
The same place where you created your first variation. It will list all created groups and variations here and you can edit or change their orders easily. Once you are done creating all of your groups and variations, you’ll see all of them in a tree. We now added a drag & drop function to make ordering really simple. You can just drag and drop any variation or group for reorder.
Groups are easy to create. You just need to name them exactly the same when you create a variation. For example, if you want to create a “Cheese” menu for your online Pizza Restaurant, when creating a variation, write “Cheese” exactly the same for the Group area, it will place variations under the same group. We also added a “suggestion” feature to make it easy, you can start typing and choose from suggestions.
You need to click the group or variation name in order to edit some details and access advanced options. When you click the group name from the variation tree, you’ll see detailed information on your screen. You can edit the name, change which category it will be active, and “selection” type. All you need to do is to click the update button to apply recent changes.
Editing a product is also the same as editing a group, only inputs are changing. You can edit name, group, and price. Also after we merged the buyer inputs area with variations, now you can change a variation to buyer input. All you need is to change the “variation” drop-down menu to text or text area fields to create a buyer input. The update button will apply all your settings.

Conditions
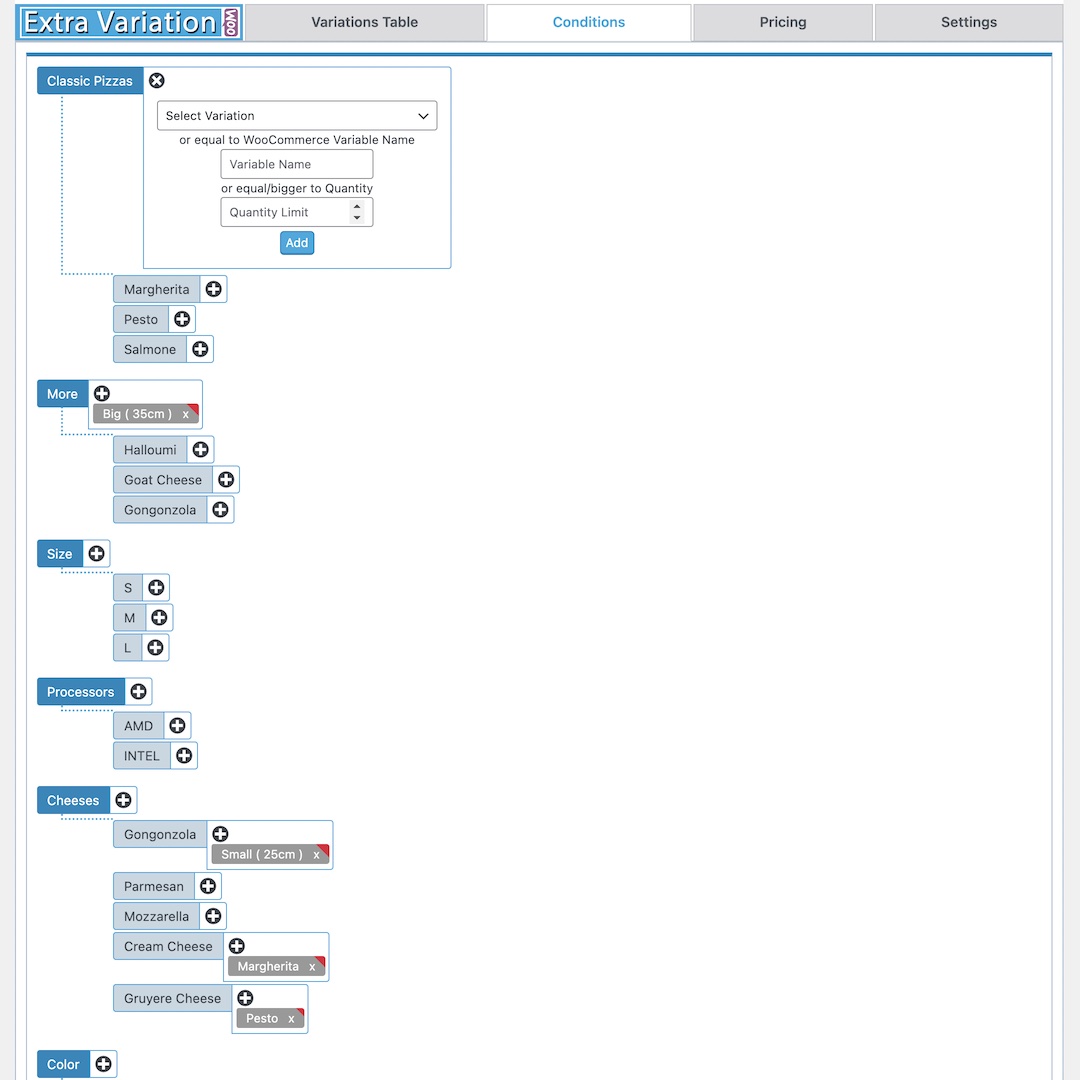
The “Conditions” section holds one of the most powerful features of our Extra Variation Plugin. You can link products and groups with each other and depending on this link you may show or hide them, change prices or lock some variations.
First of all, you need to create all of your variations and groups in order to create dependencies. After you are done with creating variations, click the “Conditions” tab to see your variation table. You’ll see plus (+) signs on your variations. You can click this sign to create a condition.
For example, if you want to make a “build your own computer” type wizard with Extra Variation. You can create some groups called Motherboard, Memory, Processors, etc. Customers need to select matching products, otherwise, the order will be failed cause certain processors only work with certain motherboards. You need to create conditions between them to prevent failed orders. Click + sign on the “Processor” variation and select the matching “Motherboard” and if it is matching with more than one, repeat this step until you select all matching products. Do it the same for the “Memory” variation, select all compatible ones. After saving this, your customer will select motherboard first and for processor and memory, they can only select the compatible ones.

Pricing
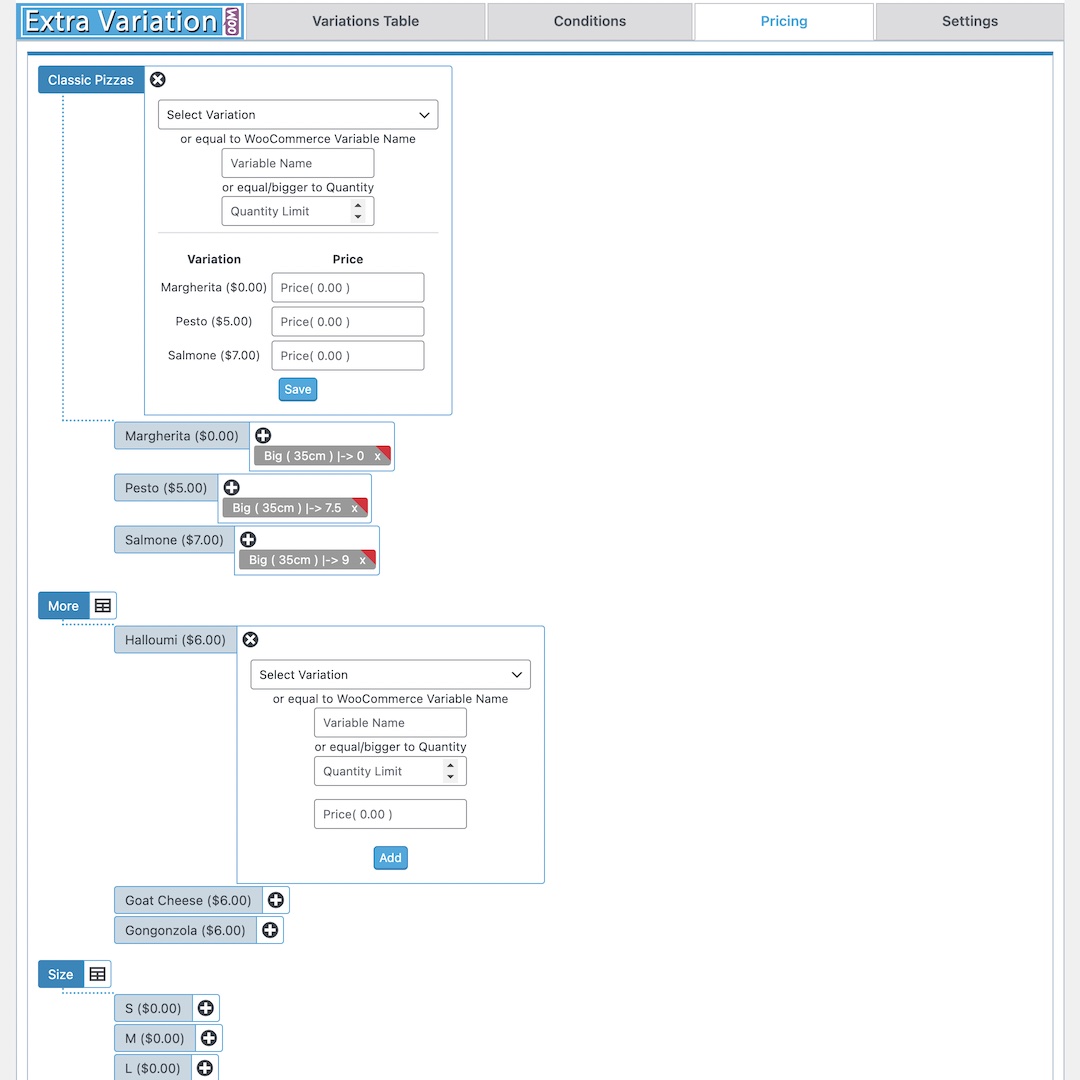
This is working almost the same as conditions, but it is not for hiding or locking, it is for changing a variable price depending on the selection.
Sometimes you may need to charge more or less for size selection. For example, if you have extra materials on a large pizza, you may charge it more than a small pizza. You can create a size group and depend on size selection, you can change the extra variation cost.
This area works with both Extra Variations or WooCommerce default variations. So you can click plus (+) sign next to the variation, select another extra variation or specify WooCommerce Variable Name (Should be equal to WooCommerce Variable Name, so write it exactly), specify the price and save. Also, you’ll see here the “quantity option” which allows you to change cost with multiple orders, you may lower the cost they add 5 of the same variation or more. (5 is an example number, you can make it whatever you want, 2 or more, etc.)
Pricing is really a powerful tool for online restaurants. You may create some seasonal offers for multiple orders or change prices for different sizes.

Settings
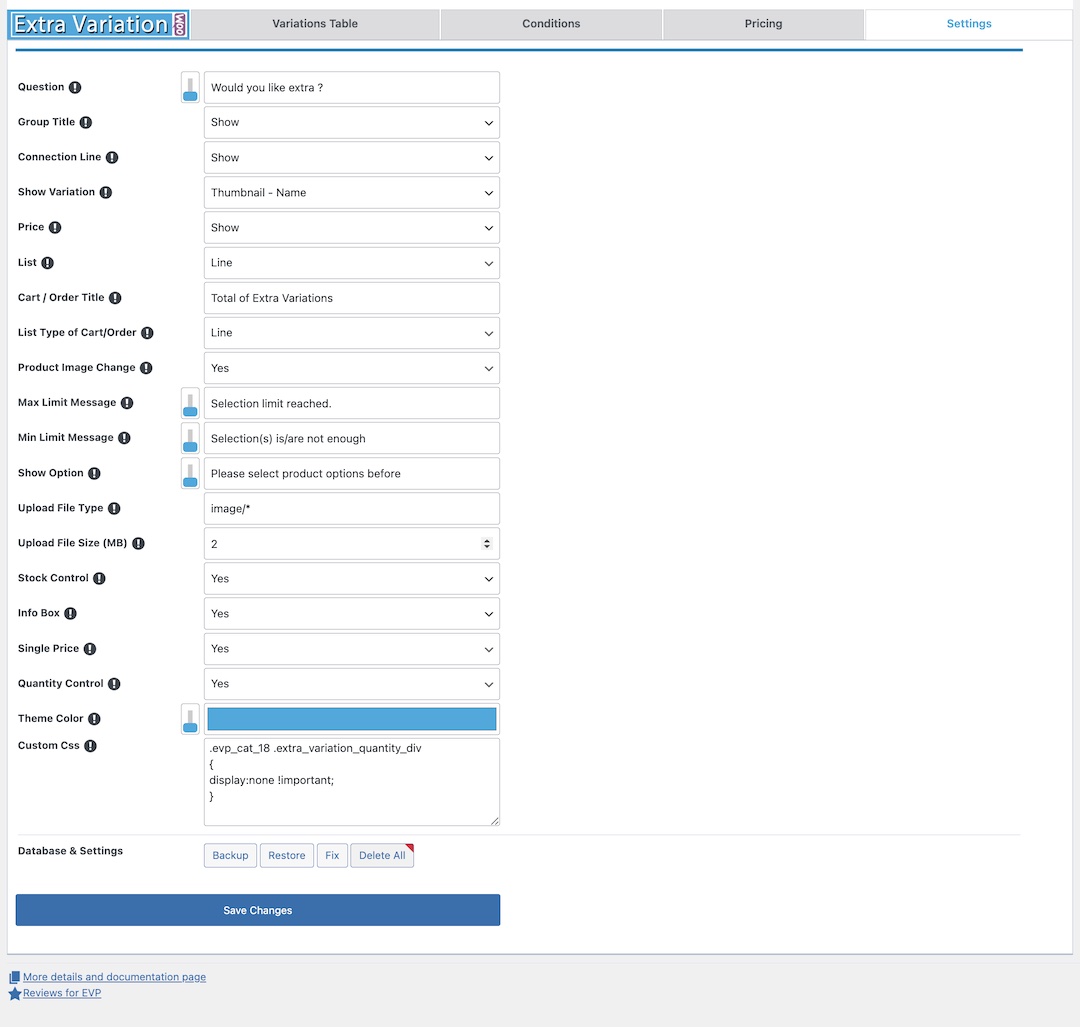
WooCommerce Extra Variation Plugin is a very easy-to-use, simple plugin but we have some little tips & tricks. Here are all the settings with detailed instructions, so please make sure to read them all before starting.
Question
This is the setting where you can add a title for the Extra Variation tree. Your customer will see right above the extra variations, you can add any caption you want. (Note: We recommend that you avoid using quotes (‘ – “) in this area. Some databases have problems converting these marks, which may cause problems.)
Group Title
Each group has its own title. You can hide or show these titles to your customers.
Connection Line
There is a connection line between Group names and variations. You can hide or show this line. This is a visual feature only, nothing changing by hiding or show except a connection line, variations still attached to their groups.
Show Variation
We have 3 different options for how to show your variation. You can set “name” only, “thumbnail” only or “thumbnail + name”. (Note: If you use the “thumbnail” only feature, make sure that you have uploaded thumbnails for all of your variations.)
Price
You can show variation prices or hide them. Also we have an option here which enables hiding some of them and showing others, you need to select hide when there is zero option. This way you can set some variation prices to 0 and their price tag will be invisible. (Note: This setting is suitable especially if you use “size” or “color” type variations, you can set their prices 0 so they will be listed as no price variations.)
List
There are two options here. One is “list”, the other is “follow-up”. This is a visual setting only.
Cart / Order Title
This is the title for cart and order pages. Whatever you write here, it will be shown on cart and order pages. (Note: We recommend that you avoid using quotes (‘ – “) in this area. Some databases have problems converting these marks, which may cause problems.)
List Type of Cart / Order
Same as the list option but this time it is for cart and order pages. You can select list or follow-up as options.
Product Image Change
By default it comes as “no”, if you change this as “yes”, when your customer selects a variation, its picture will be shown on product image area.
Attention!
Cart only shows the name of the variation. The variation thumbnail is not show on the cart.
Max Limit Message
If there is a selection limit on multi-choice features in a group, this message will be shown when the limit is exceeded. (Note: We recommend that you avoid using quotes (‘ – “) in this area. Some databases have problems converting these marks, which may cause problems.)
Min Limit Message
If there is a minimum selection limit on multi-choice features in a group, this message will be shown until your customer selects the minimum amount. (Note: We recommend that you avoid using quotes (‘ – “) in this area. Some databases have problems converting these marks, which may cause problems.)
Show Option
For variable products, you can lock and make transparent our extra variations until a variation is selected. If you enable this, extra variations will be grey and locked, it will be activated when customers select a product variation, and the variation tree will be active. You can write an indication message for your customer to tell them to select a variation first.
(Note: We recommend that you avoid using quotes (‘ – “) in this area. Some databases have problems converting these marks, which may cause problems.)
Upload File Type
You can set the type for the upload file. You must use a comma between types.
Ex : image/*,.pdf (Default: image/*)
Note: SVG files will be rejected when attempting to upload them through the media uploader. You must allow SVG through WordPress media uploader.
Upload File Size (MB)
You can set the limit for the upload file size. The entered number is MegaByte. (Default: 2 MB)
Stock Control
If you activate this option, the Extra Variation plugin will automatically start checking stocks for variations. (Please make sure that you specify stock counts for all of your variations before activating it.) If this setting is enabled and a variation is out of stock, this variation will be passive, grayed and non-selectable for orders.
Info Box
This feature shows the selected variants on the product page in a small floating window. This floating window shows on the right-bottom of the screen by default. You can use CSS tags to customize the window for your site. Also, you can choose whether to show this window or not in the settings tab.
Single Price
When displaying the price on the product page, add the selected variants’ prices to the product price and present the total as a single, combined price.
Quantity Control
Enabling this feature will display additional controls (such as +/– buttons) next to the product variations, allowing the user to select the desired number of variations (default is 1). If stock control is enabled, the quantity of pieces cannot exceed the available stock amount.
If the user selects a quantity that exceeds the stock amount for the given product variation, the quantity will not increase and an error message will be displayed in the “Max Limit” field.
Theme Color
When a color is chosen in this section, it substitutes the sections we initially painted with the standard blue color (EVP blue) with the newly selected color.
Ex: the checkbox, infobox and other relevant areas.
Custom CSS
The CSS properties entered in this field will take effect when the page is loaded. It’s important to note that this field has no code control, so it’s crucial to enter valid CSS codes.
Attention!
If you’re unfamiliar with CSS, it’s recommended to seek assistance from someone with expertise in this area.
